
[생물정보학] BIOM 형식 알아보기 + R에서 변환하고 Phyloseq으로 바꾸기
- 업데이터 : 2023-05-23
⬛ BIOM format이란?
BIOM은 Biological Observation Matrix의 약자이며, 생물학적 샘플의 데이터를 나타내는 table의 모음을 말한다. 이는 Earth Microbiome Project과 Genomics Standards Consortium의 표준규격 파일로 사용되었다. 현재 2.1.14 버전까지 출시되었다.
이 형식이 사용되는 여러 프로젝트는 아래와 같다.
- QIIME
- MG-RAST
- PICRUSt
- Mothur
- phyloseq
- MEGAN
- VAMPS
- metagenomeSeq
- Phinch
- RDP Classifier
- USEARCH
- PhyloToAST
- EBI Metagenomics
- GCModeller
- MetaPhlAn 2
⬛ BIOM format의 기능
1. 많은 데이터를 저장하고 효과적으로 다루는 것이다.
예를 들어 1)과 같이 나열된 데이터를 2)처럼 표로 만들어서 데이터의 크기를 줄일 수 있다 .
1)
sample1	OTU1 1
sample2	OTU1 4
sample3	OTU1 7
sample4	OTU1 3
sample1	OTU2 1
sample2	OTU2 5
sample3	OTU2 10
sample4	OTU2 2
sample1	OTU3 0
sample2	OTU3 1
sample3	OTU3 2
sample4	OTU3 0
2)
OTU_ID	sample1	sample2	sample3	sample3
OTU1	1	4	7	3
OTU2	1	5	10	2
OTU3	0	1	2	0
2. Sample data나 taxonomy, phylogenetic tree 같은 데이터를 통합하여 사용 가능
미생물 데이터를 예로 들어서 말하면, OTU table과 taxonomy table 그리고 metadata가 한 파일로 통합된 형식을 말한다. 기본적으로 OTU table을 biom형식으로 바꿀 수 있으며, 이후 taxonomy와 metadata를 추가하는 방식이다. 대표적으로 R의 미생물 분석 및 시각화 패키지인 Phyloseq과 유사한 형식을 가진다.
이제 실제 예제 데이터를 통해 biom형식을 이해하고. txt 파일을. biom 파일로 바꾸어 보도록 하다.
biom데이터를 다루기 전에 예시 데이터는 아래 zip파일로 저장되어있다.
sample_data.txt와 taxonomy_table.txt는 biom공식 예제를 참고하였으며, otu_table.txt는 랜덤으로 값을 입력하였다.
⬛ biom-format 사용 방법
패키지는 파이썬으로 작성되었으며 리눅스나 conda상에서 구동한다.
1. 설치
- pip를 사용한 설치
pip install numpy
pip install biom-format
pip install h5py # To work with BIOM 2.0+ files
# check
biom
- conda를 사용한 설치
conda install -c bioconda biom-format

conda activate base
biom
2. txt 파일인 OTU table을 biom 파일로 바꾸기
우리가 바꿀 txt 파일은 다음과 같다. 이는 Picrust2의 예제 파일로 각 행은 OTU 또는 ASV를 나타내며, 각 열은 샘플을 나타낸다.
맨 첫번째 행은 # Constructed from biom file 이 적혀있으며, 두 번째 행은 #OTU ID 가 적혀있다.
첫 번째 생은 없어도 되는 내용이지만 두 번째 행의 #OTU ID는 필수적으로 있어야 biom파일을 이용한 다른 분석 프로그램에서 인식이 가능하다.
리눅스 환경 상에서 biom 이 설치되었다면 아래와 같은 명령어를 입력한다.
아래 명령어는 txt파일을 biom format 중 "OTU table"로 바꾸어 주며, 이는 json형식을 따른다.
biom convert -i otu_table.txt -o otu_table.biom --table-type="OTU table" --to-json
기타 파일로 변환법은 아래 링크에 자세하게 기술되어 있다.
- biom format공식 문서_biom-conversion : https://biom-format.org/documentation/biom_conversion.html
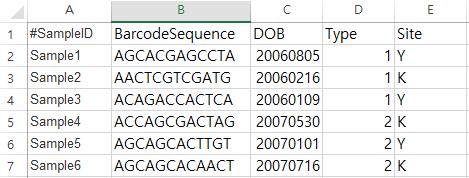
3. metadata, taxonomy 데이터를 추가해 보자
위 otu table의 matadata는 다음과 같다
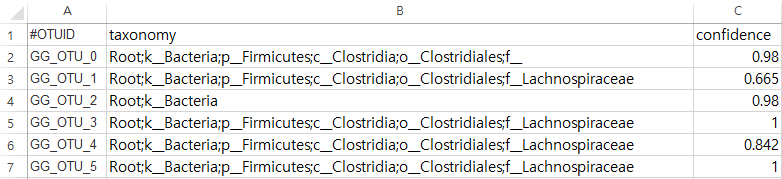
taxonomy 예제 데이터도 아래와 같다
 biom add-metadata \
     -i otu_table.biom \
     -o otu_tax_md.biom \
     --sample-metadata-fp sample_data.txt  \
     --observation-metadata-fp taxonomy_table.txt
만들어진 otu_tax_md.biom 파일은 binary파일이기 때문에 리눅스의 명령어 cat, less 등으로 관찰이 불가능하다.
그렇다
4. 다시 biom 파일에서 txt파일로 변환하기
1) otu_table.biom 파일을 txt파일로 변환하기
biom convert -i table.biom -o table.from_biom.txt --to-tsv
2) otu_tax_md.biom 파일을 txt파일로 변환하기
biom convert -i otu_tax_md.biom -o otu_tax_md.txt --to-tsv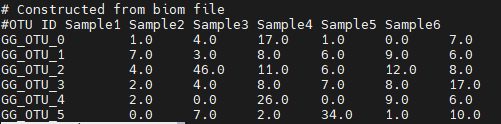
biom convert -i otu_tax_md.biom -o otu_tax_md.txt --header-key taxonomy --to-tsv
⬛ R 상에서 다루기
1) biomformat 패키지를 이용하여 R로 읽어오기
if (!require("BiocManager", quietly = TRUE))
    install.packages("BiocManager")

BiocManager::install("biomformat")

library("biomformat"); packageVersion("biomformat") # ‘1.26.0’


x = read_biom("../otu_tax_md.biom")


x = read_biom("../otu_tax_md.biom")
otu <- biom_data(x)
meta <- sample_metadata(x)
tax <- observation_metadata(x)

otu
meta
tax
2) phyloseq 패키지를 이용해서 phyloseq개체로 변환하기
library(phyloseq)
library("biomformat")


x = read_biom("../otu_tax_md.biom")
ps <- import_biom(x)
ps
# phyloseq-class experiment-level object
# otu_table()   OTU Table:         [ 6 taxa and 6 samples ]
# sample_data() Sample Data:       [ 6 samples by 4 sample variables ]
# tax_table()   Taxonomy Table:    [ 6 taxa by 6 taxonomic ranks ]

sample_data(ps)
otu_table(ps)
tax_table(ps)
⬛ 참고
- biom format공식 홈페이지 : https://biom-format.org/
- biomformat 패키지 튜토리얼 : https://bioconductor.org/packages/release/bioc/vignettes/biomformat/inst/doc/biomformat.html